
Usage & Customization
In-game controls, admin panel, dispatch panel, alerts, animations, layouts, sounds, and dispatch theming for Tommy's Radio.
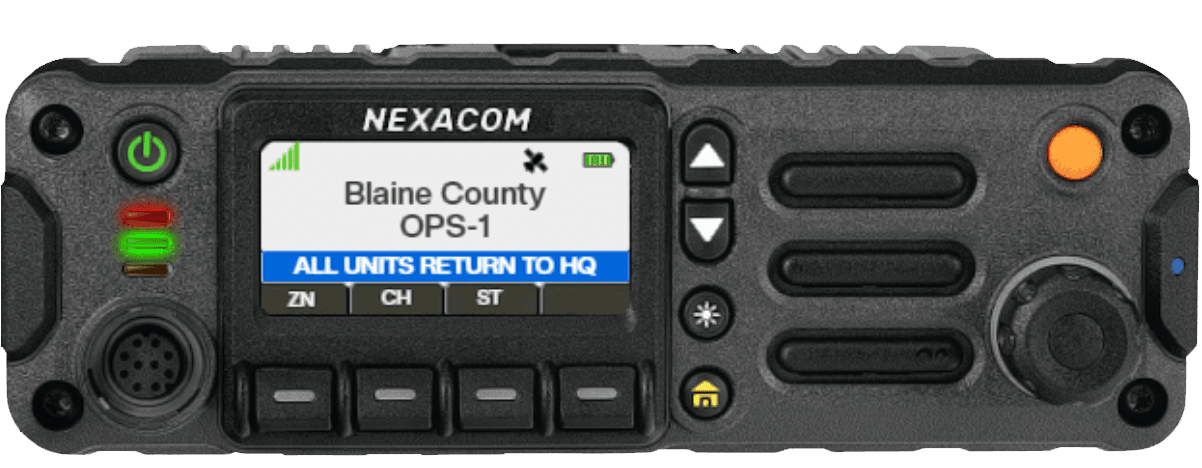
In-Game Radio
Controls
| Button | Function |
|---|---|
| ZN | Select zone |
| CH | Browse channels |
| ST | Open settings |
| CON | Connect to channel |
| DSC | Disconnect from channel |
| SCN | Toggle scanning |
| SGN | Trigger channel alert (dispatchers / tlib.admin only) |
Hold B (default) to transmit. PTT is blocked if the radio is off, the player is dead or swimming, Config.canTalk returns false, or another user is transmitting and blockTransmission is on.
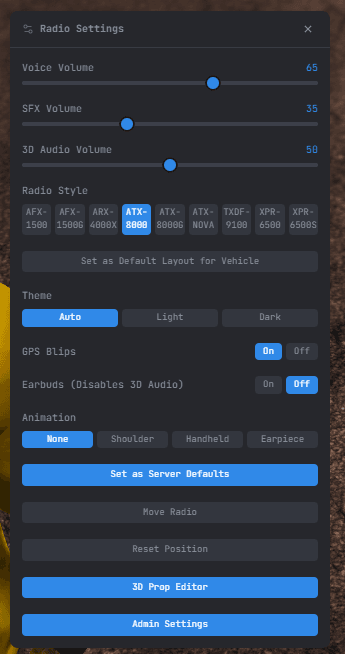
Settings Menu
ST opens the quick settings panel. /tradio opens the full settings dialog with additional options.
| Setting | Notes |
|---|---|
| GPS | Toggle your location blip visibility |
| Earbuds | Off = your radio leaks out spatially; On = private earpiece mode |
| VC / SFX / 3D Vol | Per-player volume for voice, tones, and nearby radios (0–100) |
| Style | Switch radio model (also selectable per context in /tradio) |
| DISP | Theme: Auto, Light, or Dark |
| Move | Drag to reposition, scroll to scale (0.5×–1.5×). RST resets saved position |
| MIC | Select microphone device |
| Anim | Radio use animation style |
Additional options in /tradio:
| Option | Notes |
|---|---|
| Radio Style per context | Set separate models for on-foot, vehicle, boat, aircraft |
| Separate On-Foot Focus Layout | Save a different model for focused vs. unfocused on-foot states |
| Channel List | Enable the floating channel list overlay |
| Active Talkers Only | Show only transmitting users in the channel list |
| Scan Lists | Load a preconfigured scan list from your codeplug (only when scan lists are defined) |
| Move Channel List | Drag/scale the channel list overlay independently |
3D Prop Editor
Admins with tlib.admin can place a dashboard radio prop per vehicle model. Open from /tradio → 3D Prop Editor. You must be seated in the vehicle you are editing.
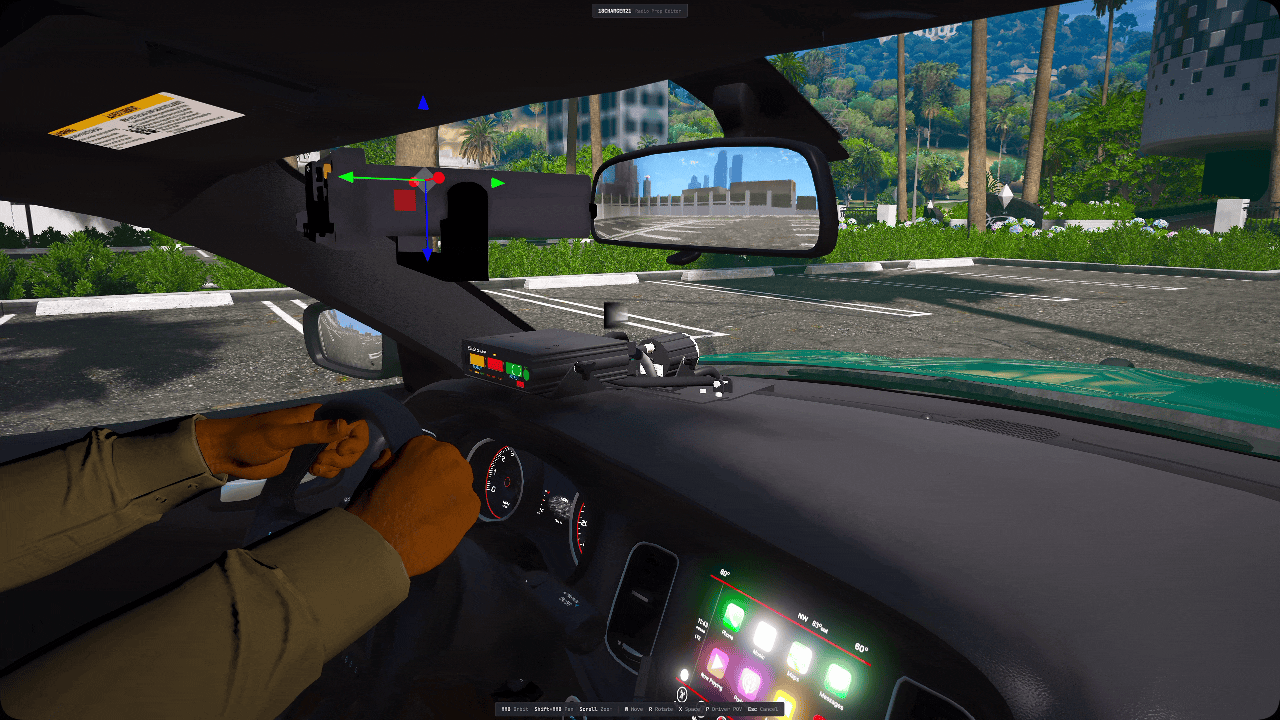
| Input | Action |
|---|---|
| Middle mouse + drag | Orbit |
| Shift + middle mouse + drag | Pan |
| Scroll wheel | Zoom |
Drag coloured arrows (translate) or rings (rotate). W = translate, R = rotate, X = toggle world/local space. Save applies immediately to all clients. Export Config copies the placement block for use in another resource.
Channel Features
Scanning
Navigate to a channel and press SCN to add it to your scan list (press again to remove). Your connected channel wins transmit priority. Transmitting on your primary mutes scan traffic until PTT release.
During a received scan transmission the display shows SC: followed by the transmitting unit's callsign, name, and agency.

Channel List Overlay
Enable via /tradio → Channel List. The overlay is patch-aware, trunked-aware, and scan-talker-aware.
- Callsign badges colored by the channel's GPS blip color
- Dispatchers labeled with a DSP badge; panicking units highlighted in red
- Header badges: zone/channel name, frequency, P for patched, T for trunked, active alert name, PANIC during emergencies
Emergency / Panic
Press emergencyBtnKey or the on-radio emergency button. GPS blip flashes red for everyone whose NAC ID is in the channel's gps.visibleToNacs. Auto-clears after panicTimeout (default 60 s — configure in Admin Panel → Settings → Advanced tab).
SGN button fires the first alert in your configured list on the connected channel. Available to players with tlib.admin ACE or a codeplug with permissions.supervisor = true. Press again to clear.
Bonking (Transmission Collision)
Keying up while someone else is transmitting plays a bonk tone. With blockTransmission on, the second PTT is suppressed. Double-tapping PTT within doubleTapWindow ms forces it through regardless. Configure in admin panel → Settings → Bonking.
Battery & Signal
Battery shows as 0–100%. Defaults: charges 0.5%/s in a vehicle, drains 0.1%/s on foot; at 0% the radio powers off. Override via Config.batteryTick.
Signal bars (1–5) reflect proximity to the nearest configured tower. When Signal Degradation is enabled, low signal degrades voice audio quality.
3D Audio
When enabled, nearby players hear your radio output (voice, tones, sirens, heli, gunshots) spatially. Range: 100 m (person) or 200 m (vehicle source).
Earbuds toggle controls your outbound 3D broadcast. Off = sound leaks out spatially. On = private earpiece mode, no spatial broadcast.
With vehicleRadio3DAudioEnabled on, entering a vehicle claims it as a 3D radio source. Walking more than vehicle3DActivationDistance m away hands the source role to the vehicle itself (200 m range). One vehicle, one owner at a time.
Callsigns
With useCallsignSystem on, players set a callsign that replaces their game name on the radio display and in the dispatch panel.
/callsign 2L-319   -- Set
/callsign          -- Clear
Callsigns persist in KVP, namespaced by tlib_community_id. Set sets tlib_community_id "your-unique-id" in server.cfg to prevent callsigns bleeding between test and production instances that share the same sv_projectName. Dispatchers can assign callsigns remotely via the dispatch panel or exports['tRadio']:setCallsign(serverId, callsign).
Admin Panel
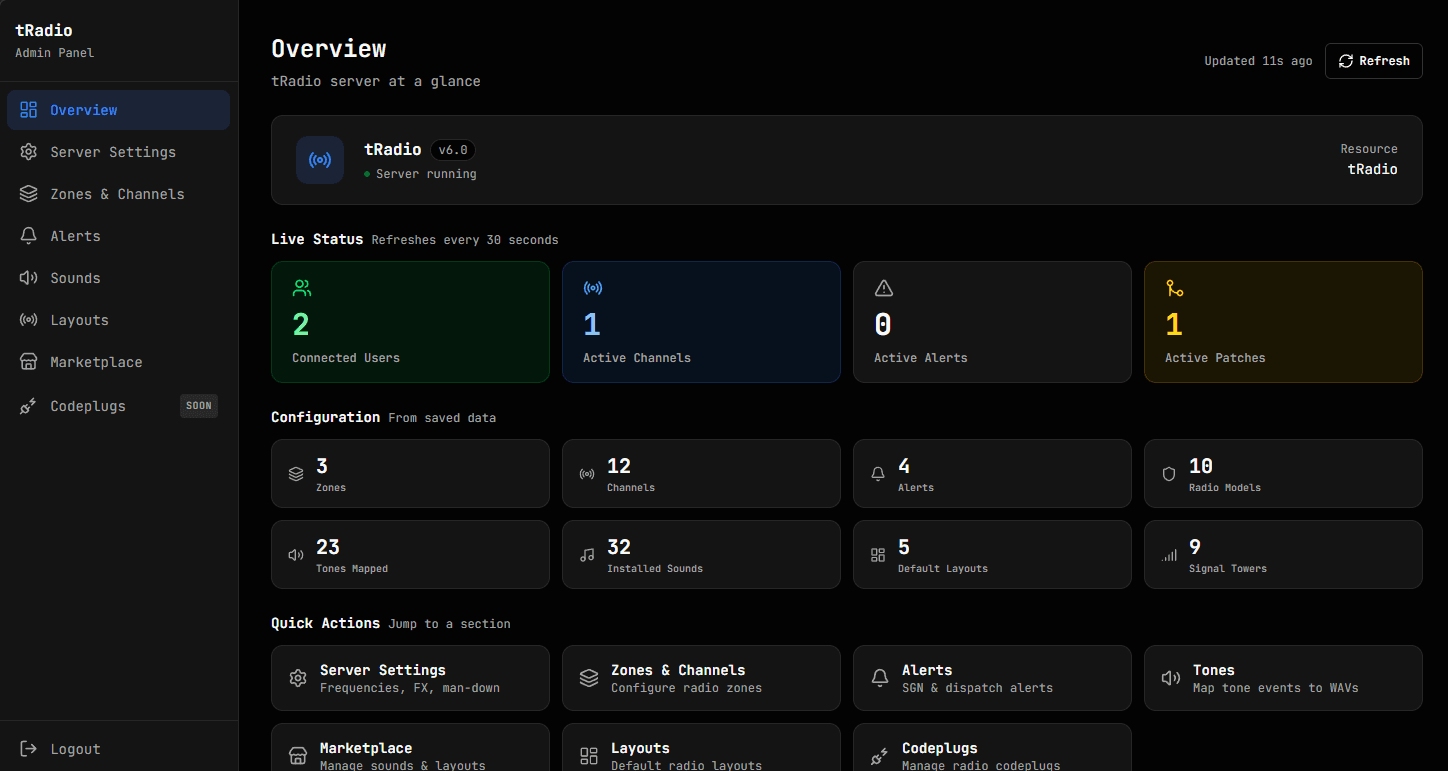
Served at http://your-server-ip:port/admin. All changes broadcast to connected clients instantly and persist to data.json. Sessions expire after 30 minutes of inactivity.
Setup & Authentication
Config = {
    adminPassword = "your_secure_password",  -- Password login

    -- Discord OAuth (optional — can use both)
    discord = {
        adminRoles = "role_id_1,role_id_2",  -- Role IDs for admin access
    },
}
For Discord, add http://your-server-ip:port/admin/auth/callback to OAuth2 → Redirects in the Discord Developer Portal.
Set a strong password
The admin panel can change every server setting and install marketplace content. Never leave adminPassword at the default in production.
The tlib.admin ACE grants in-game features only (SGN button, trunked controls, 3D Prop Editor) — it does not unlock the web admin panel.
Pages
| Page | What you do here |
|---|---|
| Overview | Live stats: connected users, active channels, alerts, patches |
| Server Settings | Audio, FX, bonking, 3D, GPS, callsign, and misc settings — four tabs: General, Audio & Radio, Controls, Advanced (live, no restart) |
| Zones & Channels | Create, edit, and reorder zones and channels |
| Codeplugs | Define radio personality templates, allowed models, default layouts, channel access, and job mapping |
| Alerts | Add and edit alert definitions |
| Sounds | Map tone names to WAV files (global and per-model) and upload custom sounds |
| Marketplace | Browse, install, and manage layouts, sound packs, and themes |
After first run, Zones & Channels is the live server config — editing Config.zones in config.lua has no effect while data.json is present. Codeplug changes apply on a player's next radio open; JOB_CODEPLUG_MAP changes require a resource restart.
Dispatch Panel
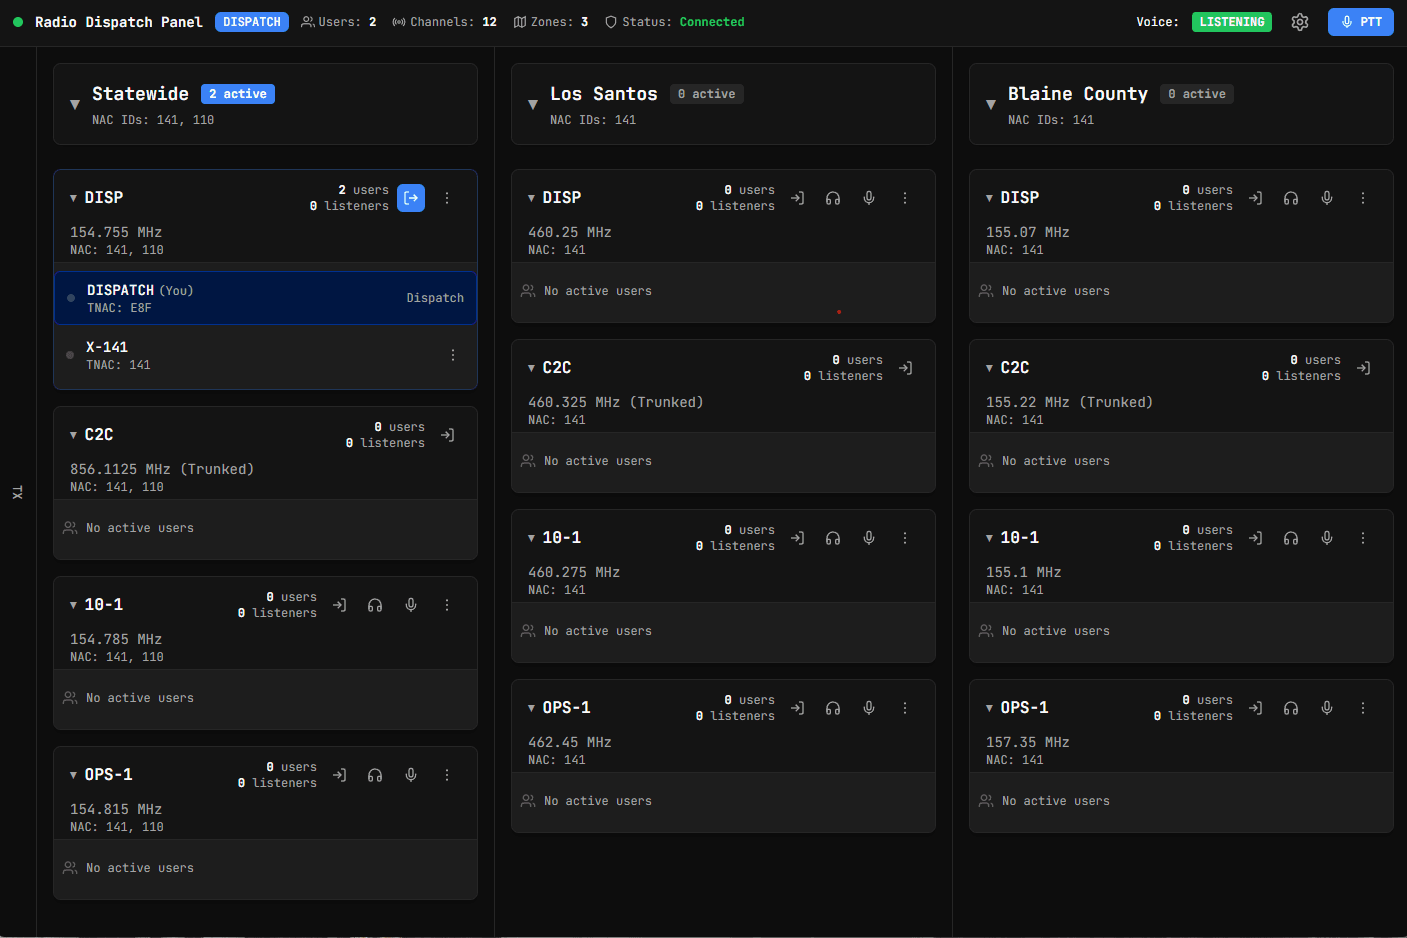
Served at http://your-server-ip:port/. Accessible from a web browser or the native desktop app.
Desktop App
Download and install
Open http://your-server-ip:port/ → Settings → Download under Desktop App. Run the installer. Or navigate directly to http://your-server-ip:port/radio/dispatch/installer.
Configure the endpoint
On first launch, enter your server URL and click Save.
Login
Enter your dispatchNacId from config.lua. If Discord auth is enabled, click Login with Discord instead.
The app auto-updates when the server version changes — an Update button appears in the header when a newer version is available.
Web Browser
Browsers block microphone access over HTTP. To enable voice:
| Method | Use case |
|---|---|
Chrome flag chrome://flags/#unsafely-treat-insecure-origin-as-secure | Development / local testing only |
| HTTPS reverse proxy (Nginx/Apache) | Production |
Without one of these, the panel shows a Mic denied warning.
Discord Authentication
Add this redirect URI under OAuth2 → Redirects in the Discord Developer Portal:
http://your-server-url:port/radio/dispatch/authConfig = {
discord = {
authEnabled = true,
clientId = "YOUR_CLIENT_ID",
clientSecret = "YOUR_CLIENT_SECRET",
guildId = "YOUR_GUILD_ID",
roles = "", -- Comma-separated role IDs, or "" for all guild members
},
}Sessions last 24 hours. Role changes take effect on the next login.
Panel Features
Voice transmission — hold T (default) or the PTT button. Same P25/analog FX processing as in-game radios. PTT key is configurable per-channel in Settings; the desktop app accepts any key or mouse button globally.
Unit management:
- Drag users between channels to reassign them
- Click the hamburger menu on a user to disconnect, send a direct alert, or set their callsign
Frequency patching — bridge two or more channels so all patched units hear each other. Create from the channel menu. Trunked channels cannot be patched. A P badge shows on all patched channels. Patches persist across restarts.
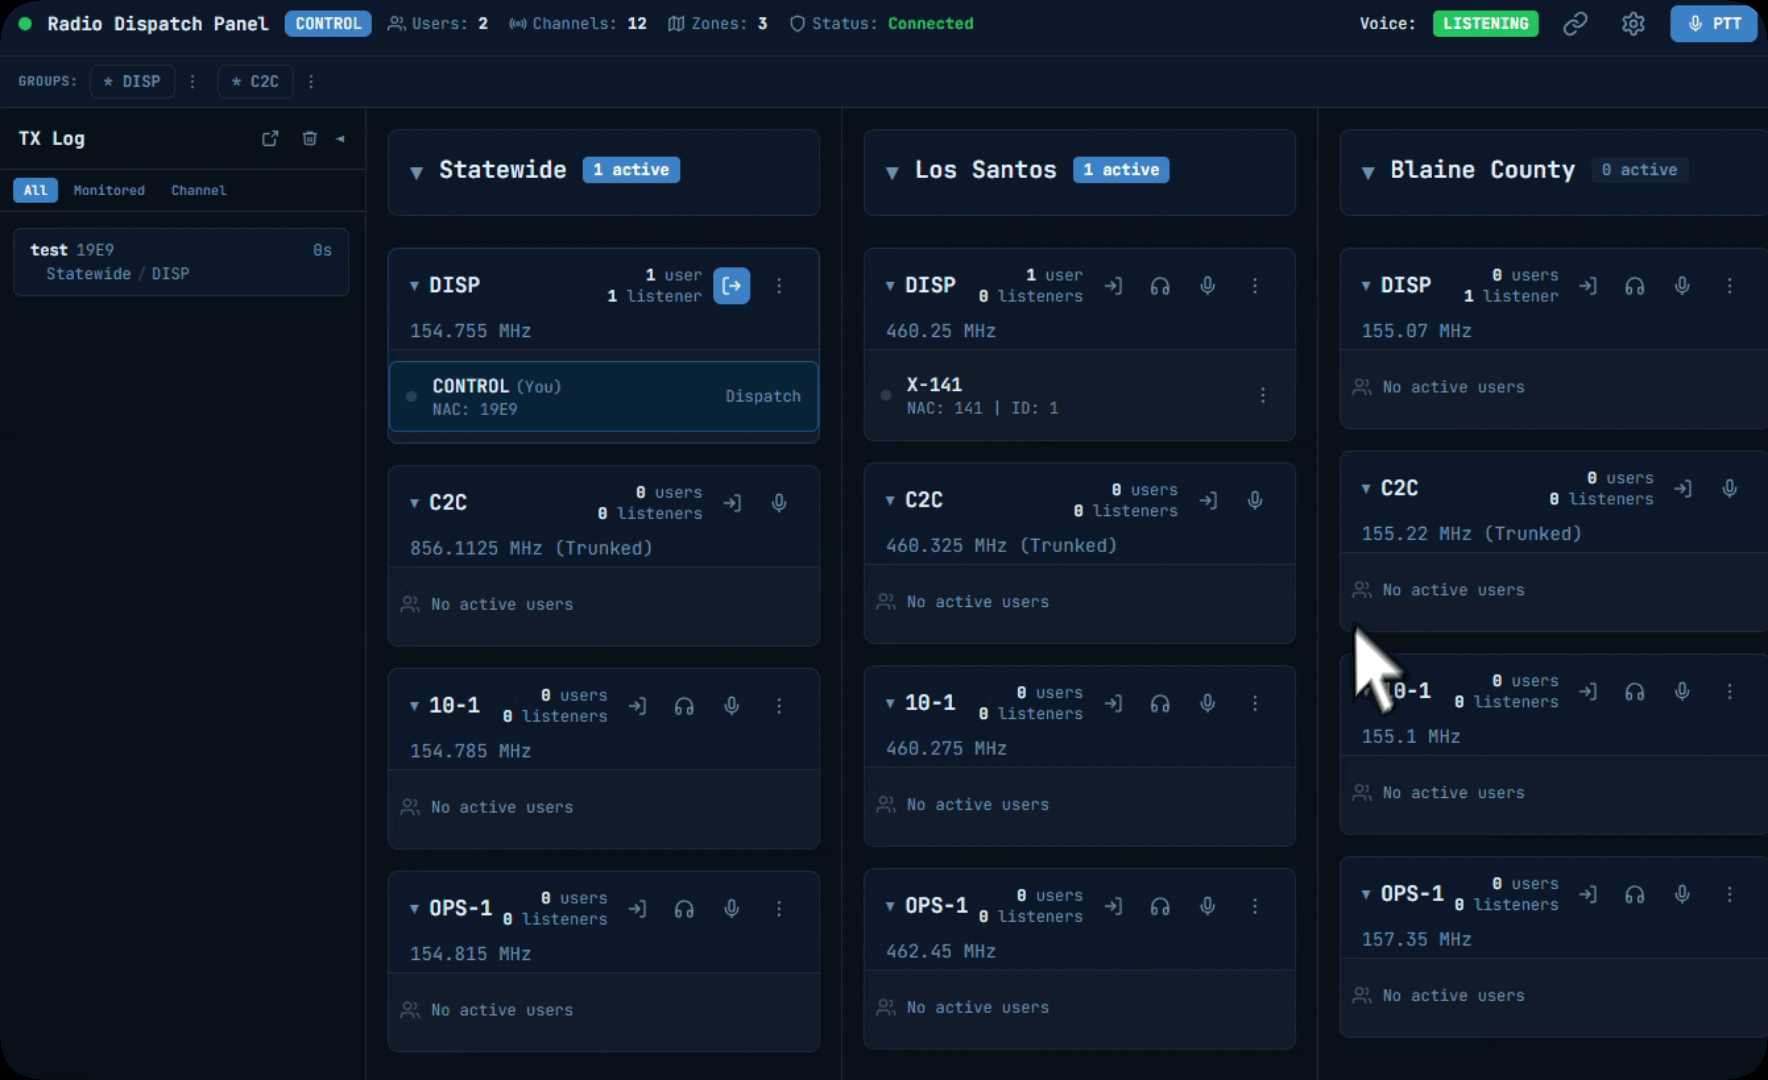
Announcement groups — arm a group of channels so your next PTT fans out to all of them simultaneously. Groups are defined in admin panel → Announcement Groups. When at least one group exists, a GROUPS bar appears above the zone list. Click a group to arm/disarm; PTT while armed broadcasts to every frequency in the group. Per-group PTT keybinds are configurable in Settings.
Transmission log — running log of all transmissions with timestamps, frequencies, and callers. Filterable, collapsible, and pop-outable (desktop only).
Alerts & Tones
Alert Lifecycle
Manage alerts in admin panel → Alerts. When triggered, a colored banner with the alert name appears on every connected radio. On first run, alerts are seeded from Config.alerts in config.lua.
Three phases, each with an optional tone:
- Activate — fires once on trigger;
tones.activateplays - Repeat — persistent alerts only;
tones.repeatfires everyrepeatIntervalms - Deactivate — fires once when cleared;
tones.deactivateplays
Simple tone (same for all phases):
{ name = "SIGNAL 3", color = "#0049d1", isPersistent = true, tone = "ALERT_A" }Per-phase tones:
{
    name = "SIGNAL 100", color = "#d19d00", isPersistent = true,
    tones = { activate = "PRIORITY", ["repeat"] = "PRIORITY_REPEAT", deactivate = "ALERT_C" },
}
Alert Field Reference
| Field | Type | Default | Description |
|---|---|---|---|
name | string | — | Display text on the radio |
color | string | — | Hex color of the alert banner |
isPersistent | bool | false | Stays active until manually cleared |
tone | string | — | Fallback tone for all phases |
tones.activate | string | — | Tone played once on activation |
tones["repeat"] | string | — | Tone played on each repeat cycle |
tones.deactivate | string | — | Tone played once on clearance |
repeatInterval | number (ms) | random 5–10 s | Gap between repeat fires |
repeatShowBanner | bool | true | Flash banner on each repeat |
deactivateLabel | string | "RESUME" | Banner text shown on clearance |
deactivateColor | string | "#126300" | Color of the clearance banner |
toneOnly | bool | false | Play tone only, no visual banner |
Triggering Alerts
| Method | How |
|---|---|
| In-game SGN button | First alert in the list on the connected channel (dispatchers / tlib.admin) |
| Dispatch panel | Any alert on any channel |
| Export | exports['tRadio']:setAlertOnChannel(freq, true, "Signal 100") |
| HTTP | POST /radio/dispatch/alert/trigger |
Tone Catalog
Map tones to WAV files in admin panel → Sounds. Changes broadcast instantly, no restart required.
PTT tones (heard by the person transmitting):
| Tone | When played |
|---|---|
PTT | Key up — conventional channel |
PTT_TRUNKED | Key up — trunked channel |
PTT_PATCHED | Key up — patched channel |
PTT_END | Key release — conventional |
PTT_END_TRUNKED | Key release — trunked |
PTT_END_PATCHED | Key release — patched |
TX tones (heard by receivers):
| Tone | When played |
|---|---|
TX_START | Another user keys up — conventional |
TX_START_TRUNKED | Another user keys up — trunked |
TX_START_PATCHED | Another user keys up — patched |
TX_END | Another user releases — conventional |
TX_END_TRUNKED | Another user releases — trunked |
TX_END_PATCHED | Another user releases — patched |
General-purpose tones:
| Tone | Typical use |
|---|---|
BEEP | Generic alert beep |
BONK | Transmission collision |
CHIRP | Short acknowledgment |
ECHO | Message received |
PANIC | Panic button activation |
ALERT_A / ALERT_B / ALERT_C | Default alert-tone slots |
PRIORITY | Default activate tone for priority alerts |
PRIORITY_REPEAT | Repeat tone for persistent priority alerts |
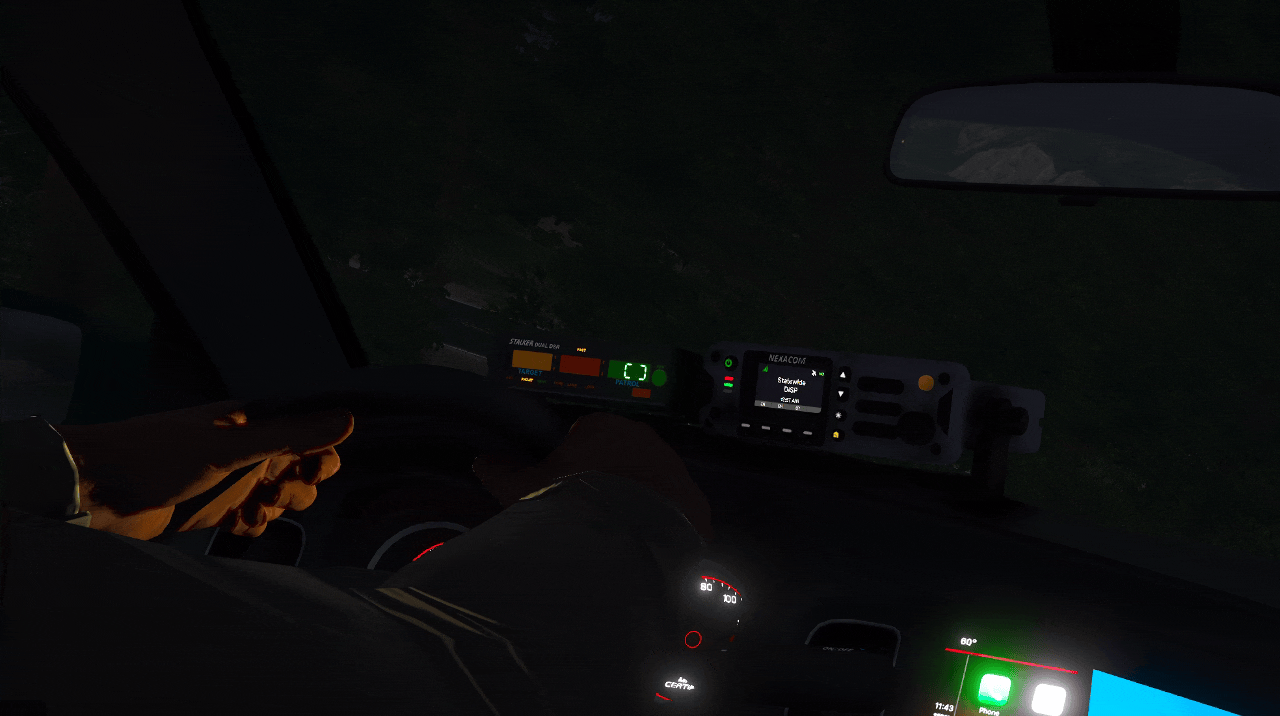
Radio Layouts
Ten models ship by default. The radio selects one automatically based on the player's current context:
| Context | Default model |
|---|---|
| On foot (focused) | ATX-8000 |
| On foot (unfocused, optional) | ATX-8000H |
| In vehicle | AFX-1500 |
| In boat | AFX-1500G |
| In aircraft | TXDF-9100 |
ATX-8000H is only active when a player enables Separate On-Foot Focus Layout in /tradio.
All built-in models (use the folder name when specifying a model in codeplugs or the admin panel):
| Model | Form factor |
|---|---|
ATX-8000 | Portable handheld — default on-foot |
ATX-8000H | Portable handheld — on-foot unfocused variant |
ATX-8000G | Portable handheld — alternate body style |
ATX-NOVA | Portable handheld — modern slim design |
AFX-1500 | Dashboard/vehicle-mounted — default in-vehicle |
AFX-1500G | Dashboard/vehicle-mounted — boat variant |
ARX-4000X | Portable handheld — compact body |
TXDF-9100 | Aviation radio — default in-aircraft |
XPR-6500 | Portable handheld — XPR line |
XPR-6500S | Portable handheld — XPR line, slim variant |
Set server-wide context defaults in admin panel → Layouts. Set per-vehicle defaults from inside a vehicle via /tradio → Set as Default Layout for Vehicle — saves the active model for that spawn code and broadcasts to all clients. Install additional layouts from admin panel → Marketplace → Layouts; installed layouts appear immediately in every player's style picker.
Sound Customization
Per-Model Overrides
To override tones for one radio model only, place WAV files at:
layouts/{YOUR-MODEL}/sounds/{TONE_NAME}.wavThese take precedence over the global layouts/sounds/ set for any player using that model.
Background Transmission Sounds
These fixed-filename WAV files play during received transmissions. Place them in layouts/sounds/ — filenames are fixed and cannot be changed.
| File | Purpose |
|---|---|
transStart.wav | Click-in at the start of a received transmission |
transMid.wav | Looping background noise during the transmission |
transEnd.wav | Click-out at the end (one of three picked randomly) |
transEnd1.wav | Click-out variant 2 |
transEnd2.wav | Click-out variant 3 |
bgSiren.wav | Siren loop (when bgModeCheck returns "siren") |
bgHeli.wav | Helicopter rotor loop |
bgDog.wav | K9 audio |
bgShot.wav | Gunshot fallback sample |
See Configuration → bgModeCheck to control which background plays based on in-game state (ELS, helicopter, K9, etc.).
Animations
How Animations Work
tRadio drives animations through two callbacks on each Config.animations entry:
| Callback | When it fires | Typical use |
|---|---|---|
onKeyState(true/false) | PTT key pressed / released | Active transmitting pose |
onRadioFocus(true/false) | Radio UI opened / closed | Idle holding pose |
Both callbacks are optional — an empty function skips it. Players select their preferred animation from the radio settings menu. Index [1] is the fallback if a player's saved choice is no longer in the list.
Animations are automatically suppressed while the player is in the driver/pilot seat or holding a weapon. Always check ShouldSuppressAnim before starting any animation.
Built-in Animations
Four animations ship by default, all using native GTA V dictionaries (no extra resources required):
| # | Name | PTT (onKeyState) | Focus (onRadioFocus) |
|---|---|---|---|
| 1 | None | — | — |
| 2 | Shoulder | random@arrests → generic_radio_enter | cellphone@ → cellphone_call_to_text + hand radio prop |
| 3 | Handheld | cellphone@ → cellphone_call_to_text + hand radio prop | cellphone@ → cellphone_call_to_text + hand radio prop |
| 4 | Earpiece | cellphone@ → cellphone_call_listen_base | — |
MakeAnimHandler is a helper that loads the animation dictionary asynchronously and cleans up on release:
[2] = {
    name         = "Shoulder",
    onKeyState   = MakeAnimHandler("random@arrests", "generic_radio_enter", nil),
    onRadioFocus = MakeAnimHandler("cellphone@", "cellphone_call_to_text", "prop_cs_hand_radio"),
},
Adding Custom Animations with rpemotes
Servers running rpemotes can add more realistic poses by wiring tRadio into rpemotes emotes. Each custom animation needs:
- An rpemotes emote that plays the animation
- A new entry in
Config.animationsthat calls it
Using an existing rpemotes emote (e.g. wt, wt4):
[5] = {
    name = "Handheld (rpemotes)",
    onKeyState = function(isKeyDown)
        local playerPed = PlayerPedId()
        if isKeyDown then
            if ShouldSuppressAnim(playerPed) then return end
            exports["rpemotes"]:EmoteCommandStart("wt4", 0)
        else
            exports["rpemotes"]:EmoteCancel(true)
        end
    end,
    onRadioFocus = function(focused)
        local playerPed = PlayerPedId()
        if focused then
            if ShouldSuppressAnim(playerPed) then return end
            exports["rpemotes"]:EmoteCommandStart("wt", 0)
        else
            exports["rpemotes"]:EmoteCancel(true)
        end
    end,
},
Using Custom .ycd Animation Files
Third-party animation packs ship as .ycd files. To use them in tRadio:
Step 1 — Stream the files through rpemotes. Copy the .ycd files into a subfolder under rpemotes/stream/:
rpemotes/
  stream/
    [Custom Emotes]/
      Radio/
        anim@cop_mic_pose_002.ycd
Step 2 — Find the clip name. The .ycd filename is the dictionary name. Open it in OpenIV or CodeWalker to inspect the clip list, or test in-game:
RequestAnimDict("anim@cop_mic_pose_002")
while not HasAnimDictLoaded("anim@cop_mic_pose_002") do Wait(10) end
TaskPlayAnim(PlayerPedId(), "anim@cop_mic_pose_002", "chest_mic", 8.0, 2.0, -1, 1, 0, false, false, false)
Step 3 — Register the emote in rpemotes. Add to rpemotes/client/AnimationListCustom.lua (never edit AnimationList.lua directly):
CustomDP.Emotes = {
    ["radiochest"] = {
        "anim@cop_mic_pose_002",  -- dictionary name (filename without .ycd)
        "chest_mic",              -- clip name inside the dictionary
        "Radio Chest",            -- display name in the rpemotes emote menu
        AnimationOptions = { onFootFlag = AnimFlag.MOVING },
    },
}
Step 4 — Add the entry to tRadio:
[5] = {
    name = "Chest Mic",
    onKeyState = function(isKeyDown)
        local playerPed = PlayerPedId()
        if isKeyDown then
            if ShouldSuppressAnim(playerPed) then return end
            exports["rpemotes"]:EmoteCommandStart("radiochest", 0)
        else
            exports["rpemotes"]:EmoteCancel(true)
        end
    end,
    onRadioFocus = function(focused)
        local playerPed = PlayerPedId()
        if focused then
            if ShouldSuppressAnim(playerPed) then return end
            exports["rpemotes"]:EmoteCommandStart("wt", 0)
        else
            exports["rpemotes"]:EmoteCancel(true)
        end
    end,
},
Restart rpemotes, then tRadio. The new entry appears in the radio settings menu.
Step 5 — (Optional) rpemotes AnimationOptions fields:
| Field | Description |
|---|---|
onFootFlag = AnimFlag.MOVING | Loop the animation and allow slight movement blending |
onFootFlag = AnimFlag.LOOP | Loop without movement blending |
Prop | Prop model name to attach |
PropBone | Bone index (28422 = right hand, 60309 = left hand) |
Animation Reference
MakeAnimHandler(dict, anim, prop)
| Argument | Type | Description |
|---|---|---|
dict | string | GTA V animation dictionary (e.g. "cellphone@") |
anim | string | Clip name within that dictionary |
prop | string|nil | Prop model to attach to the right hand, or nil for none |
Find prop model names at forge.plebmasters.de/objects.
ShouldSuppressAnim(ped) — returns true when the player is in the driver/pilot seat or holding a weapon.
rpemotes exports:
exports["rpemotes"]:EmoteCommandStart("emoteName", 0)  -- start emote
exports["rpemotes"]:EmoteCancel(true)                  -- cancel (true = play cancel anim)
Dispatch Panel Themes
Dispatch themes are published on the marketplace and installed from admin panel → Marketplace → Themes. A theme can be a simple colour palette swap or a completely custom dispatch UI built in JavaScript.
Each theme has two optional layers:
| Layer | Field | What it does |
|---|---|---|
| CSS | cssText | Override CSS variables and inject raw styles |
| JavaScript | jsText | Full programmatic access — read state, react to events, call actions, replace the DOM |
CSS-only themes are always safe. JS themes require an explicit source-review acceptance before installing.
To create a theme: go to tgstudios → Marketplace → Themes → Create Theme, write your CSS (required) and optionally JavaScript, and publish. Updates to a published theme are available to installers on their next dispatch panel refresh.
CSS Variables
Override any of these in your theme's cssText:
| Variable | Default (Dark Minimal) | Purpose |
|---|---|---|
--bg-primary | #030303 | Page background |
--bg-secondary | #141414 | Channel cards, panels |
--bg-hover | #262626 | Hover / subtle highlight |
--text-primary | #fafafa | Primary labels and callsigns |
--text-secondary | #a3a3a3 | Frequencies, counts, hints |
--accent-raw | #4da6ff | Active channel, links, PTT indicator |
--danger | #ef4444 | Panic / emergency |
--success | #22c55e | Online / connected |
--my-dispatch-bg | hsl(220 100% 13%) | Your joined channel — background |
--my-dispatch-border | hsl(220 100% 28%) | Your joined channel — border |
--other-dispatch-bg | hsl(270 100% 13%) | Other dispatchers' channel — background |
--other-dispatch-border | hsl(270 100% 28%) | Other dispatchers' channel — border |
Shadcn/UI variables (also overridable):
| Variable | Purpose |
|---|---|
--background / --foreground | Root page background / text |
--card / --card-foreground | Card surfaces |
--primary / --primary-foreground | Primary interactive elements |
--secondary / --secondary-foreground | Secondary surfaces |
--muted / --muted-foreground | De-emphasised areas |
--destructive / --destructive-foreground | Danger / delete actions |
--border | Component borders |
--input | Input field background |
--ring | Focus ring colour |
--radius | Global border radius |
Example — dark green theme:
--bg-primary:     #0a0f0a;
--bg-secondary:   #111a11;
--bg-hover:       #1e2e1e;
--accent-raw:     #4caf50;
--text-primary:   #e8f5e9;
--text-secondary: #a5d6a7;
--my-dispatch-bg:     hsl(120 60% 10%);
--my-dispatch-border: hsl(120 60% 25%);
Set extends to a built-in theme ID to inherit all its variables and only override what you need. Available base IDs: dark-minimal (default), dark, dark-blue, basic, basic-dark.
These five built-in themes are also directly selectable in the dispatch panel's own Settings menu — no marketplace install required.
Dispatch JavaScript API
The full JS API reference — globals (dispatch, theme, onUnmount), events, actions, DOM control, and a complete panel replacement example — is documented on the API Reference page.
JS themes run directly in the dispatch panel with full DOM access. Dispatchers are shown the complete source code and must explicitly accept a warning before installation.
Theme JavaScript receives three injected globals:
| Global | Purpose |
|---|---|
dispatch | Read state, subscribe to events, call actions |
theme | CSS helpers, DOM control |
onUnmount(fn) | Register cleanup for when the theme changes or unmounts |
See the API Reference for the full reference: dispatch.getState() state shape, all events, all actions, DOM control methods, security model, and a complete panel replacement example.